Virtual staging has moved from novelty to norm in real estate marketing. Sellers want speed, buyers want clarity, and agents want the impact of beautifully presented spaces without the cost and logistics of physical furniture. The tools have matured, and when paired with strong real estate photography, the results can be convincing. That power creates a responsibility. If the render appears too real, where is the line between smart marketing and misrepresentation? The answer depends on disclosure, accuracy, and intent.
I have worked with brokerages that embrace virtual staging as a core tactic, and I have seen the fallout when it is used carelessly. The following guidelines come from that day-to-day experience across listings, legal reviews, and buyer feedback. They are aimed at agents, brokers, and the real estate photographer who wants to deliver striking imagery without inviting complaints, chargebacks, or regulatory trouble.
What virtual staging is, and what it is not
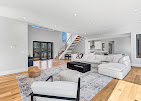
Virtual staging is the digital placement of furniture, decor, and sometimes light cosmetic items into photos of a property. You start with a clean, well-exposed base image, then add a sofa, rug, art, or a dining set to help buyers understand scale and flow. This is different from rendering an entirely new kitchen, altering structural features, or airbrushing away every defect. It is also different from full CGI previsualization for a new development, where the images are clearly labeled as artist’s renderings.
The best use of virtual staging is interpretive, not deceptive. It shows how a space can live while keeping the underlying reality intact. That philosophy drives the legal best practices that follow.
Why disclosure is non-negotiable
Disclosure is the anchor. In many states, marketing rules use a variation of the “reasonable consumer” standard: would a typical buyer be misled by your materials? If the answer might be yes, you need clear labels and straightforward descriptions.
Practically, that means every virtually staged image should be labeled as such. The label needs to be legible on mobile and desktop, not buried in footnotes or a single MLS remark. If you are posting a carousel of images, each staged image gets its own label. If you provide a flyer or printable brochure, the caption should travel with the image. In MLS systems that strip overlays, add “Virtually staged” to the image caption field and include an explicit note in the photo description or agent remarks.
Buyers forgive virtual staging when they see transparency. Problems arise when a buyer arrives expecting an immaculate, furnished space after viewing photos that never mentioned digital staging. Clear labeling prevents that gap.
The line between enhancement and alteration
Every photographer makes minor edits: correct color casts, straighten verticals, balance exposures, and remove sensor dust. HDR photography and perspective adjustment are standard. Those adjustments are generally accepted because they present the space more faithfully to the eye.
Virtual staging stretches that premise. You are adding elements that never existed. That is fine when the additions are furniture and decor. It becomes risky when edits change fixed attributes, eliminate known defects, or imply improvements that do not exist.
Acceptable uses include furnishing an empty living room, presenting alternate layouts for a flexible bedroom, or swapping styles to appeal to different buyers. Risky uses include erasing a power line visible from a window, removing a wall-mounted AC unit, replacing dated tile with a wood floor that is not present, smoothing over cracks or water stains, or “brightening” a basement window well into a daylight-filled garden view. Those changes alter substantive facts.
I advise teams to ask a simple question before approving any edit: if a buyer stands in this room, will any material element look meaningfully different than in the photo? If yes, do not make that edit, or create a clearly labeled “renovation concept” image distinct from marketing photography.
Jurisdiction matters, but consumer law is broadly consistent
The specific rules vary by state and by MLS, but two themes show up everywhere: do not mislead, and disclose material facts. State real estate commissions often caution against any digitally enhanced imagery that could create a false impression about condition or features. Some MLSs require watermarks that read “Virtually staged.” Others require unaltered images as the first set, with staged versions later.
If your brokerage crosses borders, build to the strictest common denominator. That usually means labeling, offering unstaged versions, and never masking defects. Keep a standard operating procedure that your agents and preferred real estate photographer sign off on, so there is no ambiguity when deadlines hit.
How to label without ruining the aesthetic
Designers worry that big labels break the mood. They do not have to. Subtle, consistent placement works: lower right corner, text set in a simple sans serif at about 14 to 18 points, contrasting enough to be legible on both light and dark scenes. On platforms that allow captions, repeat the disclosure in the text: “Living room - virtually staged.” If you share a real estate video or a 360 virtual tour with staged elements, show a title card up front stating that some scenes are virtually staged, and add small corner text on scenes where staging appears.
For printed materials, the caption directly under each image is the place to do it. A global disclaimer on page two will not save you if the individual image gives a misleading impression.
Before-and-after pairs build trust
One of the most effective ways to satisfy both marketing and ethics is to show both states: the empty room and the virtually staged interpretation. Buyers see the bones and the vision. It also curbs complaints, because the unstaged image proves the space matches reality.
If you deliver 20 photos, consider 8 to 10 unstaged images covering every area, then 8 to 10 staged versions for the key rooms. The MLS may limit total photos, so pick high-impact rooms: living room, primary bedroom, dining, office or flex room, and outdoor living if appropriate. Keep bathrooms and secondary bedrooms simple unless scale is confusing and a bed would help.
Virtual staging for new developments and renovations
For preconstruction or heavy renovation, virtual staging becomes visualization. In that context, place it under the banner of “artist’s rendering.” Be specific about what is included in the offering and what is conceptual. A range hood shown in a rendering that is not included in the base spec needs a callout. Smart developers pair renderings with real estate floor plans that reflect accurate dimensions, ceiling heights, and window placements, then list material selections by package. The more precise the documentation, the less risk of a buyer claiming reliance on an image for features not delivered.
When marketing these projects, add a clean, dimensioned plan and a finish schedule alongside the staged visuals. If you use 360 virtual tours or real estate video built from CGI, add a persistent overlay: “Artist’s rendering - finishes, fixtures, and furnishings not included.”
Working with your photographer and editor
Great virtual staging starts with strong base photography. A real estate photographer should deliver straight, true-to-scale images with consistent white balance. Using HDR photography is fine, but avoid the overly processed look that washes out shadows into grays. Editors rely on believable light and color to seat virtual objects naturally. If the ambient light reads warm at 3200K, the staged lamp should cast a similar tone. Mismatches trigger a viewer’s sense that something is off, which can cause doubt about the entire listing.
Discuss staging intent before the shoot. If you plan to virtually stage the living room with a sectional and a media console, the photographer can shoot from an angle that leaves space for furniture without blocking architectural features. Ask for a clean version with no personal items and a second for safety if you anticipate reflections, aquarium glare, or mirrored walls that might complicate staging.
Finally, set ground rules with your editor. Give a prohibited-edits list that includes removing defects, changing permanent fixtures, or altering views. Most reliable editors will already refuse those requests, but the clarity helps when timelines are tight.
Accuracy, scale, and the reality of spatial perception
A frequent complaint from buyers is scale. A staged photo shows a generous sectional. In person, the living room barely fits a love seat. The error comes from lens choice and interior styling that cheats margins. A wide lens can stretch perceived space. That is a known problem in real estate photography, and it is amplified when virtual furniture hugs walls with zero circulation.
Stay realistic: leave walking paths, respect door swing clearances, and align furniture sizes with standard dimensions. If the room is 10 feet by 12 feet, a queen bed and two nightstands probably fit, but your image should show modest nightstands and tight margins, not a king bed flanked by chests. Use correct seat heights and table diameters. Most staging libraries include scale, but double check.
This is one area where adding a measured floor plan pays off. Real estate floor plans with interior dimensions defuse arguments about scale. If the plan shows the living room width at 11 feet 4 inches, buyers can validate whether their 100-inch sofa fits. Combining the staged photo with a precise plan is both helpful and protective.
Handling property condition honestly
Do not hide condition. If a wall has obvious water staining, you cannot wipe it digitally and present the room as freshly painted. If the carpet is worn through in the traffic path, do not place rugs to conceal it. If the property will be repaired before listing, repair it in reality and then photograph it. If repairs are pending, you can stage and disclose, but you may need a separate set of images after work is complete.
The same applies to exteriors. Real estate aerial photography and twilight shots can dramatize a facade, but you still should not remove utility poles, crowded neighbor houses, or nearby commercial signage. You can choose vantage points that flatter the lot and landscaping, and you can clean debris and straighten the flag in post, but stay within the realm of what a buyer will see on arrival.
Transparent captions that help, not hedge
Captions can do more than check a box. A few words of context raise trust. For example: “Virtually staged to show furniture scale. Room is currently vacant.” Or, “Home office shown with a desk and built-ins for concept only, no built-ins installed.” That language is clear, readable, and service oriented. It avoids the vague “images may be enhanced” that fails both legally and practically.
Virtual staging inside immersive media
As 360 virtual tours gain traction, staging is following. Some platforms allow toggling between empty and staged states. That toggle is gold from a disclosure standpoint, since buyers can switch views instantly. If you stage a 360 tour without a toggle, add persistent on-screen labels in scenes that contain digital furnishings, and note it in the tour description.
Real estate video is trickier. Motion sells, and a moving camera can make staged furniture feel more convincing than stills. Because the impression is strong, the disclosure must be obvious. Use on-screen text up front, then a small corner label in sequences with staged items. If only a few scenes are staged, cue the label only when it applies. If the entire video relies on staging, consider an intro card that states it plainly, with a voiceover note the first time you transition into the main space.
Model homes, short-term rentals, and specific-use spaces
Model homes and furnished rentals occupy a gray zone. Many are physically staged. If you mix physical and virtual, a simple note prevents confusion. For a short-term rental, virtual staging can show a sleeper sofa or bunk beds that are not present. That is a misstep. Hotel and STR law intersects with consumer protection standards. If you show bedding or kitchen equipment that does not exist, you can trigger refund obligations or platform penalties. Only stage what the guest will actually find on arrival, or clearly mark concept images and keep them separate from booking photos.
For mixed-use properties, like live-work lofts, virtual staging can illustrate office layouts. Keep egress clear in staged images, and do not imply code-compliant occupancy or ADA accessibility if the space does not meet those standards. A caption like “Work area concept shown - verify zoning and occupancy with local authorities” is often appropriate.
Document your process
Brokerages that avoid problems treat virtual staging like a compliance process, not a creative fling. Save the original, unedited images. Keep a folder of staged versions with timestamps and version numbers. Archive your labels and captions. If a buyer disputes, you can show that you disclosed clearly. It also helps with MLS audits or board inquiries.
Store your signed scope of work with the real estate photographer. If the scope prohibits altering permanent features, and you stick to it, you have another layer of protection.
Cost, turnaround, and where to spend
Virtual staging costs range widely. A typical price per image falls between 25 and 75 dollars, with premium services higher. Turnaround runs 24 to 72 hours depending on complexity. Photographers often bundle a set, for example 6 staged images with standard editing for a flat fee. Spend where it matters: the hero rooms and cover images. Do not waste budget staging closets or utility rooms. If funds are tight, prioritize the living area, primary suite, dining space, and a home office if the market expects it.
HDR photography and careful lighting reduce the editor’s work, which can lower revised image fees. If you plan to add 360 virtual tours or a real estate video, coordinate your visual narrative so that stills, motion, and immersive elements feel consistent. You do not need every channel for every listing. Use aerials when lot context adds value, skip them when the property is densely packed and the air view undermines your story.
Setting buyer expectations at showings
Agents often forget the last mile. If your listing uses virtual staging, mention it in showing confirmations and in the physical space. creative HDR photography A simple sign on the entry table stating “Photos show rooms virtually staged. Home is presented vacant” prevents awkward first impressions. If you provided staged and unstaged images online, invite the buyer to open the gallery on their phone to compare layouts onsite. People appreciate being treated like adults. It shows respect and reduces the chance of an adversarial tone later.
Mistakes to avoid, learned the hard way
Over the years, I have seen a few recurring issues that invite trouble. The worst is masking damage. A basement with efflorescence on the walls was presented with virtual shelving and boxes that conveniently covered the problem. The buyer discovered it at inspection and felt deceived, resulting in a withdrawn offer and a complaint to the board. Another case involved staging a patio with a fire pit on a building that banned open flames. The resulting HOA conflict made the agent look careless. And a third involved “removing” power lines from a living room window view. The MLS flagged the image, and the listing was temporarily pulled.
On the positive side, a team that paired every staged photo with an empty counterpart saw fewer questions and faster offers. Buyers could trust the representation and make quicker decisions. The lesson is consistent: clarity sells better than gloss.
Practical standard operating procedure for teams
A lightweight SOP keeps everyone aligned. Here is a compact workflow that meets most MLS and consumer standards while staying efficient:
- Capture: Shoot clean, well-exposed base images with straight verticals, neutral white balance, and minimal personal items. For key rooms, shoot an alternate angle for staging flexibility. Select: Choose the 6 to 10 rooms that will most benefit from virtual staging. Keep at least one unstaged image of each featured room for the MLS set. Stage: Provide the editor with a mood board or style notes that fit the property and buyer profile. Prohibit removal of defects or alteration of fixed elements. Confirm furniture scale. Label: Apply an on-image “Virtually staged” tag to each staged photo. Add matching captions in the MLS and any web galleries. For video and 360 tours, include scene-specific labels and a global note. Publish: Upload unstaged images first in the MLS photo order where required, followed by staged versions. Archive originals, staged files, and captions in a dated folder.
Keep this checklist handy. It shortens approval cycles and prevents last-minute improvisation that leads to errors.
The ethical upside of doing it right
Honest virtual staging is not a defensive posture. It makes your marketing better. Buyers can visualize lifestyle and flow, sellers feel their home is presented respectfully, and agents avoid the friction that comes with overselling. When you combine well executed staging with objective assets like measured real estate floor plans, transparent captions, and a few honest angles from real estate aerial photography, you create a package that earns trust. Add a short real estate video to tell the story of movement through the space, and a lightweight 360 virtual tour for rooms where orientation matters, and you have a complete, truthful picture.
The truth is that almost no one buys a home based on furniture. They buy based on light, scale, neighborhood, and the feeling that comes from imagining their life there. Virtual staging supports that vision when deployed with restraint. The legal guidelines simply formalize common sense: do not hide facts, do not imply what is not there, and always show your hand. If you hold to that, the marketing wins are real, the risks manageable, and your reputation intact.
Edge cases worth considering
There are a few nuanced scenarios where judgment matters. Properties with tenants often cannot be decluttered or physically staged. Virtual staging is the only viable option, but tenant possessions may appear in the base image. Get written consent before publishing, and avoid staging over personal items that could be construed as misrepresentation of current condition. In heritage properties, respect period details. Placing ultramodern furniture can help buyers see contrast, but do not digitally remove original millwork, radiators, or stained glass to “simplify the lines.” That crosses from styling into historical erasure and can offend your core buyer segment.
Snow or seasonal changes present another edge case. Replacing winter photos with lush green lawns in July is fine when the listing is live in summer, but do not fabricate a seasonal state that implies year-round conditions, like leaves obscuring a neighboring structure that will be fully visible in winter. If you need curb appeal in February, focus on twilight exterior shots that highlight lighting design rather than digitally painting spring.
Technology will keep improving, your standards should stay firm
Rendering engines and AI helpers can now produce shadows, reflections, and texture that fool trained eyes. Do not let that tempt you into editing reality. The technology is a tool, not a license. The easy path is to set a principled baseline and never cross it, regardless of how seamless the software becomes.
That baseline is simple enough to memorize: label staged images, keep a clean unstaged set, never alter fixed features or erase defects, and ground the visuals with measured facts like dimensions and accurate floor plans. If you treat virtual staging as interpretive furniture, not construction, you will stay on the right side of both ethics and law.
Final thoughts from the field
Virtual staging has saved many listings that would otherwise feel cold or confusing. I have watched buyers move from indifferent to engaged the moment they saw a dining table placed realistically under a pendant or a queen bed staged in a tricky alcove. The marketing lift is real. The guardrails are equally real. When agents, photographers, and editors share the same rules, the process is smooth: great base images, careful staging choices, crisp labels, and no games.
Bring your team along. Train new agents with side-by-side examples of acceptable and unacceptable edits. Share a few war stories about what happens when you push too far. And do not forget the basics. Good real estate photography, a straightforward real estate video, accurate real estate floor plans, and, where helpful, 360 virtual tours and real estate aerial photography, will carry a listing further than any single trick. Virtual staging shines when it sits on top of honest, thoughtful marketing, not when it tries to replace it.